I've a friend who started a thread about leaving Facebook. Now, I don't know what his
Facebook habits are, like (get it?) how much time he spends on it daily, but I've never
thought he posted too often or was particularly combative on threads I've seen. But the
point he made wasn't really about politics and associated vitriol that has seemed to sully
everybody's Facebook experience since 2016 — it was about Facebook as a steward of its
users' data.
In the same thread, another friend posted a link to a neat commentary by Shelly Palmer
about precisely that sort of thing. My favorite few words from the post get straight to
the point:
Right now, you get to use Facebook, Google, Gmail, Waze, and other “free” apps
for the cost of your data. If you don’t want to pay with your data, you are welcome
to make other choices.
That's really the bottom line. Palmer's post also recounts for us the Cambridge Analytica
scandal and observes, "The silver lining ... is the fact that you are becoming aware of
what data you create, what is collected, and how it is used."
And by the way, let's be clear about what this Cambridge Analytica mess really is —
It's about Facebook and their privacy practices.
This wasn't a breach like Equifax, Anthem or MySpace.
Data wasn't taken. Facebook gave CA's researcher the data, because in part the researcher lied about
its use.
Let's move on.
Inspect Your Facebook Settings: Facebook Authentication
Facebook is more than just a social media platform. It's also a very convenient authentication
platform. Loads and loads of phone and web apps offer authentication using your Facebook credentials
as a way for you to access their content. But, as stated above, there's a price to using Facebook
authentication elsewhere, and that price is your Facebook data.
Do me a favor. Open up the Facebook app on your mobile phone. Right now. Let's take a look at
the permissions you've given the apps that use Facebook authentication.
Jeff Rossen did a piece on this on the Today Show last week, and
I was grateful for the walkthrough. Here's how — at least, on the iPhone:
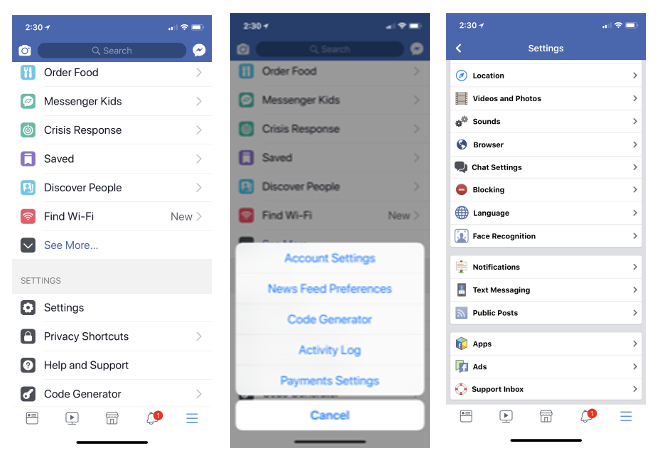
- Open up the Facebook app's settings by clicking on the icon in the lower right corner of the
Facebook app's screen — the one that looks like three horizontal lines. Don't confuse this with
the iPhone's settings.
- Once the form loads, scroll to the bottom to the region marked "SETTINGS", and tap on the word
"Settings" to the left of an icon that resembles a white gear against a gray background.
- A menu should pop up with a few different headings. Tap "Account Settings."
- On the Settings screen, scroll to the bottom and tap on "Apps."
- You'll arrive at Facebook's Apps and Websites form. Tap on "Logged in with Facebook".
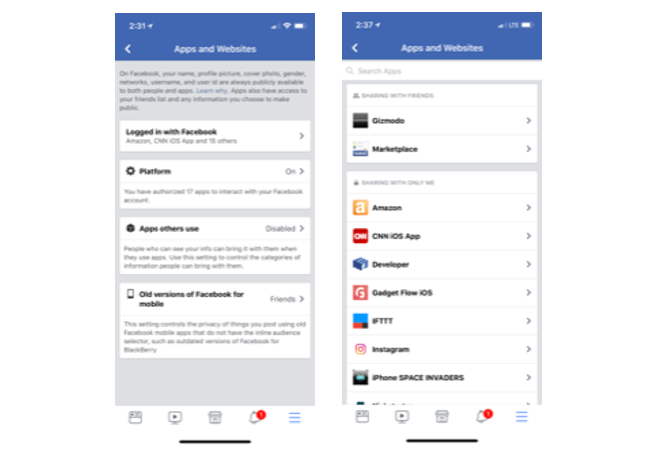
Spend a few moments taking this all in. This form is now separated into regions by sharing settings,
in increasing order of privacy. In other words, the group of apps that are shared only with
yourself are at the bottom, and the group of apps that are shared with the public are at the
top.
Just spend a few minutes surfing this Apps and Websites area and make certain you're good
with your settings, or change them. Different apps will request different data — some of them
will take absolutely everything they can get:
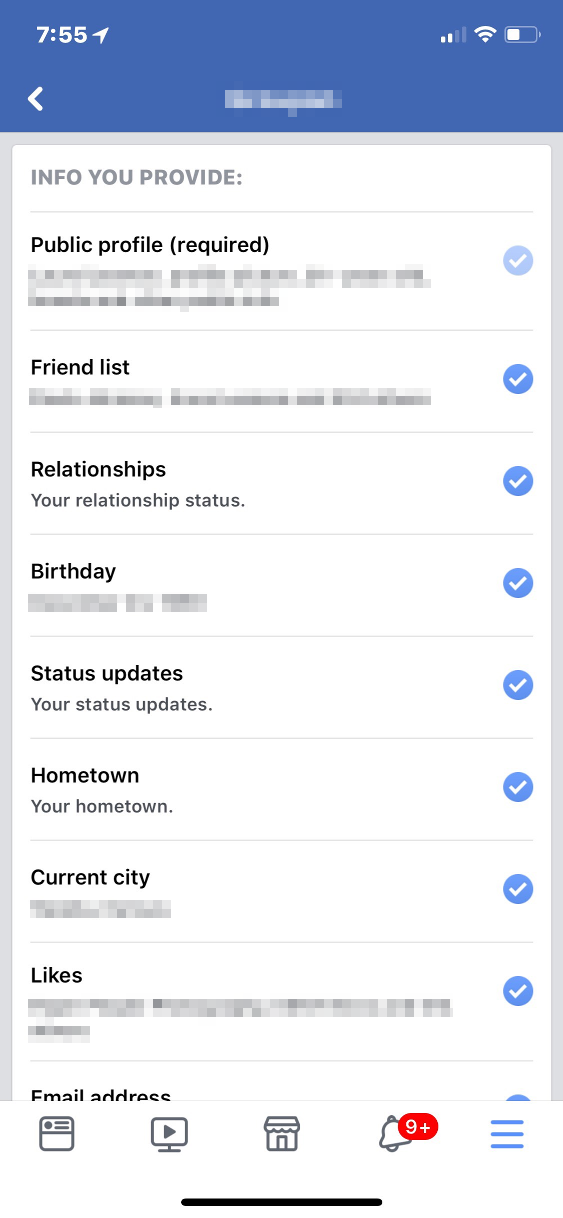 In exchange for logging into this app with your
Facebook account, the app is collecting information on your friends, your posts, your likes,
your birthday, and more.
In exchange for logging into this app with your
Facebook account, the app is collecting information on your friends, your posts, your likes,
your birthday, and more.
If you're not comfortable with the Facebook data
you are providing this third-party app, you can change those settings here. Personally, I've set
all of my apps and websites to share data with only me, and have limited the particular data to
my public profile and maybe my email address, but that's it.
Inspect Your Facebook Settings: Posts Privacy
When I think of "Facebook" and "privacy," the privacy of my posts is the first thing I
think of. In a time of change, a couple of years after I joined the network, I figured out
how to use Facebook's lists capability and came to use it exclusively, despite whatever
other controls Facebook introduced in the years since.
The key to the effectiveness of the list method is in your post security. You have to be
certain that the visibility of every post you make is restricted to your lists. That means
at least the posts you make from here on out, but could include modifying every post you've
ever made (as far back as your wall goes) if you want to be thorough. The choice is yours.
Imagine two lists, for the sake of simplicity. One is your "white list", with ALL of your
Facebook friends on it. The other is a "black list," for putting friends in "time out" on
occasion. Let's say you have a friend who has been getting particularly annoying of late —
maybe you've tired of her constant Candy Crush posts, or you're just done with the poltical
rancor he is spreading. Put them in the penalty box by adding them to your "black list."
Just make certain the privacy on your posts is set to only include the "white list", and
to specifically exclude the "black list." Doing this for all subsequent posts effectively
denies "black list" members visibility to anything you post (except for profile picture
changes) until they're off the "black list." If you chose to change the settings on all
of your previous posts, people in the penalty box will see none of your posts on your wall.

You'll likely have multiple lists. I do — life isn't as simple as black and
white (lists). The more lists you make, the greater the demand for maintenance. For example,
every new friend you take on must get assigned to a list with view permissions for them to
be able to see any of your posts on your wall. I started with a "white list," then branched
out. Some lists are confined to my neighborhood, and some are confined to family. I also
have a "children" list, so posts that aren't appropriate for younger eyes can exclude that
group. You get the idea.
Creating, populating, and maintaining lists is much easier using a PC browser than on a
mobile device. So log into Facebook on your browser, and look down the left side of your
News Feed for a heading called "Explore." Click on the item titled "Friend Lists." You may have
to click on "See More..." to reveal it.
You should land at this URL: https://www.facebook.com/bookmarks/lists/.
You can create and manage lists here. Clicking on an existing list will show your wall,
filtered to the list you clicked on — but you can see and manage the list's membership on
the right side either in the header or in a section titled "On this List".
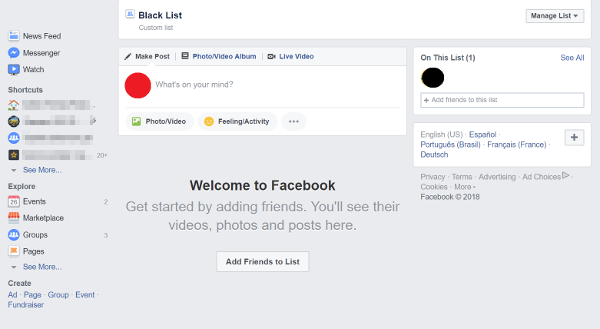
The screen shot above is my actual "black list." There's currently one person on it,
and this list has been in existence for over ten years. Notice the list has zero access
to any of my posts on my wall. Toldja it's a penalty box!
I find it's much easier to manipulate the permissions of a single post using a
computer browser than to attempt it through a mobile app. I think the way to go is
to find a custom permissions set that will work well for most of your posts and to
revise permissions once posts are made, than to mess with the permissions prior to
creating the post. This is largely because a change in the permissions settings
before you make a post will be retained until you change it again.
Let's say you're going to post some pics for your motorcycle buddies. I find
it's better to leave permissions as they are, make the post, then edit the
permissions on that one post, than to edit the permissions at the start, make the
post, then have to change the permissions back to the way they were; particularly
if your standard custom set is complex or if you're posting from your mobile phone.
Think about it this way: using the latter method, you might easily change the
permissions to being only viewable by your motorcycle buddies list and make the post
from your phone; but if you forget to get onto your laptop later and correct the
custom permissions set, everything you post until you get it corrected will default
to go only to your motorcycle buddies list.
A few years after I started my list scheme, Facebook created several automated
lists, like "Family" and "Acquaintances" and so forth. The premise is exactly the
same -— consider these as "starter" lists. They'll require the same maintenance
as the lists you create.
Use Facebook's Privacy Checkup
Facebook has created a privacy checkup wizard. Apart from an appearance on your
wall from time to time, you can also access it from your iPhone by tapping the
Settings icon, then scrolling down to the SETTINGS region and tapping on the
Privacy Shortcuts menu item.
The Privacy Shortcuts screen is also where you can verify your posts settings
and even explore Facebook's data policy.
You Own Your Facebook Data
Remember that you can always request the data Facebook has on you. Log into
Facebook on your computer or phone's browser — not the app — then go to Settings.
The easiest way to do this is to click on the downward arrow at far right on the
blue banner at the top, then click "Settings." You'll land at the General Account
Settings. You'll see a series of rows of data — Name, Username, Contact, et cetera.
Below this is a link you might otherwise miss: it reads, "Download a copy of your
Facebook data."
Conclusion
- The Internet is forever. Be careful about who can see what you post.
- "If you don't want to pay with your data, you are welcome to make other choices."
- Check the permissions you've given to third party applications by using Facebook's authentication.
- Check the privacy of your posts. You can use lists if you've got the drive to see it through.
- Facebook has a Privacy Checkup wizard available for you to run at will.
- You can download a copy of your Facebook data at will.
Finally (if this hasn't been bad enough), check out this Twitter thread from Dylan Curran where he
reviews all of his data from Facebook and Google.